From the Active Display Console, select Action / Edit Devices
The main ipSentry Device Editor window is your primary location for manipulating and configuring device monitoring functions.
This is the location where you will Add, Remove, Modify, Group, Suspend, Resume, Group, Rename etc.
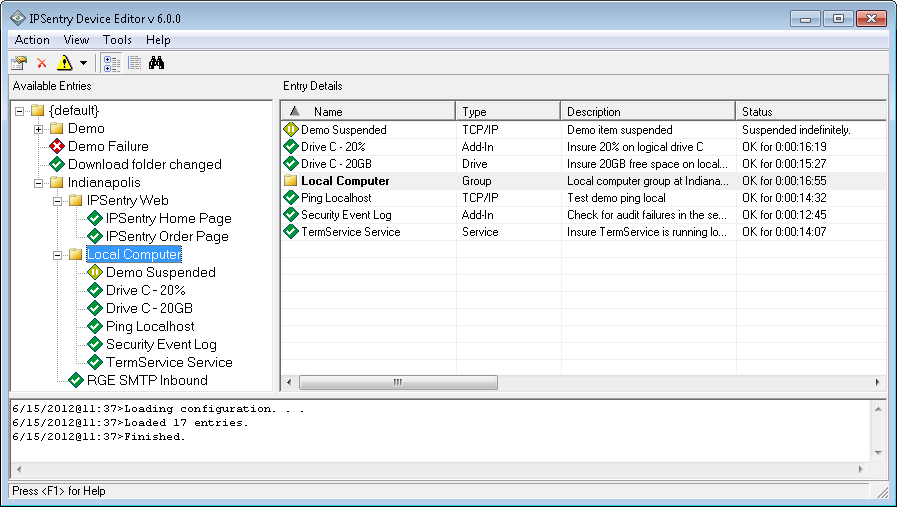
Available Entries
The available entries area contains an hierarchical view of your monitored
items, groups, templates and an iconic references to the current state of the
devices.
You may drag entries in this area into new groups, edit the name of the entry directly, suspend, resume, delete, or select for editing from this area.
Icon Meanings
The following outlines the meaning of the various icons which will be displayed next to the various entries.
- Represents a Group or Template type entry.
- Represents a device in normal / stable state.
- Represents a device that is currently suspended and is not being polled
- Represents a device whose state is critical.
Entry Details
The entry details area contains a list of entries within the currently selected
Available Entries group. The parent entry will appear in bold and
the remainder will appear in normal font weight.
The following details regarding each entry are displayed in columnar format for
review:
Name
Type
Description
Status (time in status)
Info (brief description of the entry)
Attempts - Total attempts since internal counters cleared.
Failures - Total critical results since internal counters cleared.
Activity Display
In the activity display, you will see current activity of ipSentry
activity such as loading, saving, testing results, etc... This area is for
informational purposes.
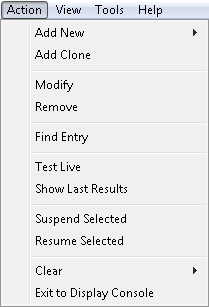
Main Menu
The main menu along the top contains the following options.
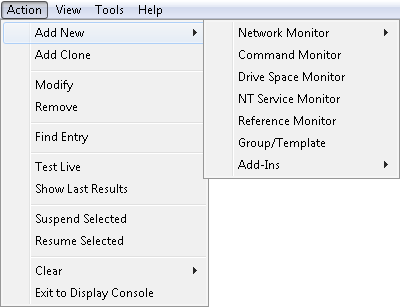
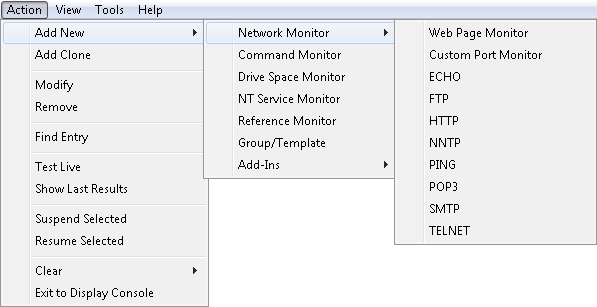
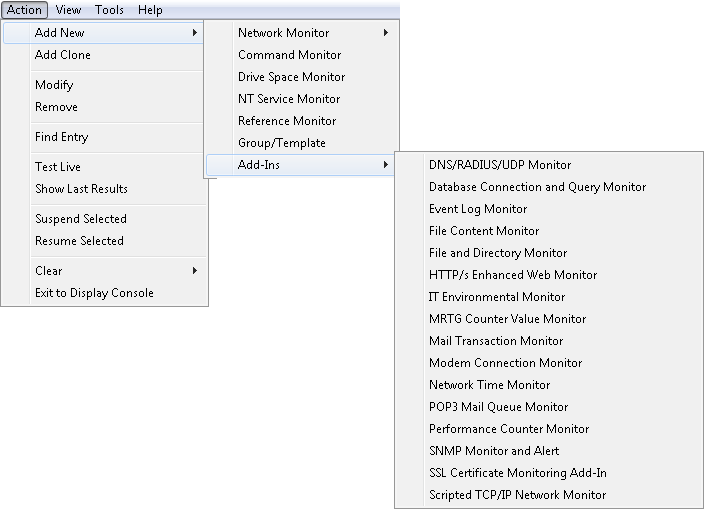
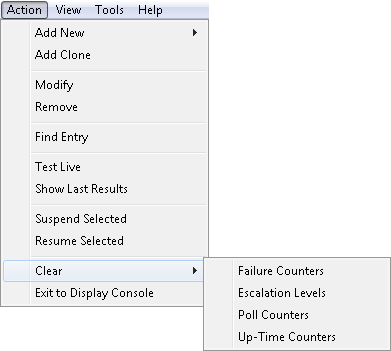
Add New
Select this menu option to add a new entry and select the type of entry you wish to add. When you select this option, you will be presented with a submenu showing the available types of monitored items you can add. When add-in options from this location, the monitoring type will be pre-selected and some basic settings will be pre-configured when you are presented with the Device Configuration options. See Device Configuration for more information on the available types.
Add New Network Monitor
Add New Add-In Monitor Sub Menu
Add Clone
Select this menu option to duplicate the currently selected entry as a new entry. A new entry will be added with the identical configuration settings as the selected entry. The name of the new entry will be pre-pended with "Copy of" in order to generate a pseudo-unique name for identification.Modify
Select this menu option to modify the currently selected entry in your list.Remove
Select this menu option to delete the currently selected entry in your list.Find
Select the Find option to locate an existing entry based on a simple find search. The Find option will search the Name and/or Description in order to locate matching entries.Test Live
Select this menu option to perform a live test on the entry as if it were running during a live cycle.\Show Last Results
Displays the last attempt, success, failure, and result information for the selected entry.Suspend Selected
Select this menu option to suspend the currently selected entry in your list. You will be presented with the standard Suspend For / Suspend Until options for confirmation and selection of the resume date or indefinite suspension.Resume Selected
Select this option to remove the suspended status from selected devices.Failure Counters
This option clears the internal counters for alert schedules based on Failure Counts. ipSentry keeps track of the current failure sequence for each alert in order to adhere to the defined Alert Schedule. Selecting this option clears this counter and sets the counters to zero. Basically, this places the alerting schedules in a state as if no failures or recoveries have occurred. This does NOT clear the up-time statistics information.Up-Time Counters
This option clears the counters that are used to keep track of Attempts, Failures and calculate the Up-Time ratio for the machines. Use this option to reset the Up Time ratio. Note that the "Last Cleared" date will be also be changed to the current date and time.Poll Counters
If you are using Poll Frequencies, this resets the current poll count for all devices to zero. Thus, if you have a poll frequency of 10 for all devices and they are on poll 9 of 10, they will now be on 0 of 10 and start the poll counting from this point.Escalation Levels (pagers)
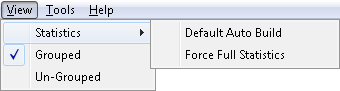
For pager/cell/SMS alerting, ipSentry keeps track of the last alert point in order to escalate paging. Selecting this option will reset the schedule information and pager/SMS messaging will act as if no notifications have been sent (e.g. it will start it's next alert on the first entry in the list.)View
Select this menu option to access the Statistics view submenu.
Default Auto Build
Selecting this option initiates a standard Statistics Auto Output report and brings up the primary output report in your browser. This report is the report that is built automatically if you have turned on Auto-Output Statistics in the system settings configuration.Force Full Statistics
Selecting this option initiates a full statistics report build. This ignores report exclusions and creates a report of all devices.Grouped
Selecting this option initiates a full statistics report build. This ignores report exclusions and creates a report of all devices.Un-Grouped
Selecting this option initiates a full statistics report build. This ignores report exclusions and creates a report of all devices.Tools
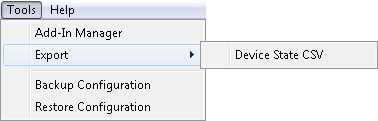
Select this menu option to access the Tools submenu.
Add-In Manager
This option will bring up the ipSentry Add-In Manager which allows Loading / Unloading / Licensing of add-in components. See Add-In Manager for more information.Export - Device State CSV
Provides a quick export of the full device state to a comma delimited file of your choice. This allows for quickly importing your monitored device list, heirarchy, and state information into external databases and spreadsheets.The format of the CSV contains the following field data:
Parent Name,
Entry Name,
Type,
Status,
Success Count,
Failure Count,
Total Attempts,
Success Rate %,
Time in current state,
Last Attempt Date,
Last Failure Date,
Last Success DateBackup Configuration
Select this option to perform a named backup of your current configuration data. The ipSentry backup performs a basic configuration backup into a zip compatible file with the .IPZ extension. This file can be read using standard zip viewing tools and the files extracted or added as desired.Restore Configuration
Select this option to perform restoration of your data from a previously backed up state. This option should only be used if you do not have a current backup of your data using other backup means since the data contained in the backup reflects only basic configuration information and will overwrite any existing statistical data, configuration settings. The backup does not contain cache and state information for many add-in components. Also, if you are referencing files outside of the ipSentry folder, these are not contained within the backup - only the references to the files as they exist in the configuration data.
The Backup/Restore option is NOT a substitution for roper backup procedures.
Tool Bar
The toolbar along the top under the main menu provides one-button access to the
following functions.
Add New (button)
Clicking this option will add a new entry and bring up the Device Configuration for editing. The settings will simply be the configuration data applied to the Default Configuration.Properties (button)
Clicking this option will bring up the Device Configuration Editor allowing you modify the properties of the selected entry.Delete (button)
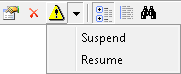
Clicking this option will delete the currently selected entry.Suspend / Resume (button)
Clicking this option will present you with the option to Suspend or Resume the selected entry.Suspend Item
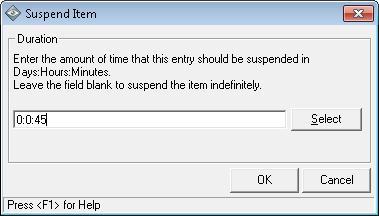
When selecting to suspend an item, you will be presented with the suspend duration dialogue allowing you to specify the duration for which this item should be suspended. You can enter the time in DAYS:HOURS:MINUTES using the original dialogue, or click the "Select" button in order to select a date/time on which the item should resume monitoring.If you leave the duration field blank or set to 0:0:0, the entry will be suspended until manually resumed.
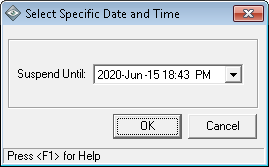
Suspend SelectIf you click the Select button on the Suspend Item dialogue, you will be prompted for the date/time on which the item should be resumed. Specify the date/time on which this item should be resumed.Group View (button)
Clicking this option cause the Available Entries list to displayed has a hierarchical format of devices by grouping entries based on their dependency status.Un-Group View (button)
Clicking this option cause the Available Entries list to displayed as a list in alphanumeric order.